Hello Everyone!
Today I'm doing a quick post to show you my tropical nail art, or hawaiian shirt nail art :p
I'm going on holidays tomorrow so I wanted bright neon nails to go with the sun and sea! The picture really don't do justice of how bright they really are!
Once again it's a gradient, I can't stop from doing them since I got liquid latex, because clean-up has never been easier. And I also stamped some hibiscus flowers, to fit the tropical theme.
I know, once more, I used the Claire's Neon polishes, you are probably tired of that, but it's been such a long, sunny and hot summer, it's all I have been wanting to wear lately :) Bear with me!!
The suitcase is packed and I'm all ready to go have some great time!! Weeee
I'll see you when I come back!
-Mags
Showing posts with label Neon. Show all posts
Sunday, August 9, 2015
Saturday, August 8, 2015
Mags' BPS Review & Fruity Nail Art
Hello Everyone!
The last review I have for you is for another Born Pretty Store's stamping plate, it the fruits pattern plate from Ia Qin An number Y004.
This plate is perfect for the leadlight technique or the reverse stamping. Its fine sketched lines make for a beautiful finish.
You get strawberries, grapes, apricots, pears, lemons and apples. Yummy!
When I saw how fine the lines were I have to admit I was a bit worried they wouldn't stamp well, but I was pleasantly surprised! You do have to stamp quickly though as there isn't a lot of polish to stamp with so it dries very fast. But nothing impossible.
I decided, to do neon fruits (I know , what a shocker ;p), because why the Hell not, right?
Aren't they so yummy looking?
That's it for the Born Pretty Store reviews for now, I hope you found them useful. Remember you can use the code BESG10 to get 10% off on all the website.
I'd like to thank BPS for sending me those 4 products to review, I do like them all, and I would recommend them. I didn't get paid by or am I affiliated with this company, I just really liked the products.
I'll see you next time!
-Mags
Wednesday, August 5, 2015
Mags' BPS Review & Neon Watermarble Nail Art
Hello Everyone,
today I'm doing the third review from Born Pretty Store, and this time it's nail art studs we're going to talk about.
In this very well packaged pot (trust me, the cat dropped it on the floor twice and it didn't open or exploded, phew) you get 2 shapes of studs. The rounds are full neon colors (yellow, orange, pink, green, blue and purple). The squares are 2 colors (1 black + 1 color) with different patterns. As much as the neons ones are fairly common, the square ones are quite original.
The studs are nicely flat and rest nicely on the nails. I have no cons about those really.
And as you know I had to do some nail art because life without nail art is sad!
So I went the easy road as for the studs, and picked the simple neon ones, but then I did a watermarble accent nail, so you can't blame me. I hate watermarble and I very well suck at it, but for some weird reason, I decided to do this (probably got secretly inspired by my friend +Elie Corzo ) and I did it, first try, no mess (well almost, did dip 2 fingers instead of one because i'm clumsy) and the result was great!
The Claire's Neon polishes I used for the watermarble worked incredibly, which let's face it, is a first for me.
Those neons studs over black look amazing!! Remember that you can use the code BESG10 if you're tempted (or for any other temptation ;))
We got one more review to go!
I'll see you next time!
-Mags
Saturday, July 25, 2015
Mags' Paradise Palm Trees Nail Art
Hello Everyone!!
Once again I'm coming here and sharing a palm trees nail art. Can you all tell I'm longing for my vacation to start? Two more weeks to wait, so in the meantime, I'm bringing paradise to my nails.
I did those in a hurry before meeting friends for drinks and diner so they aren't as prefect as they could be. Also the pics are not the best quality for the same reason :/
I've done a gradient again, mostly because I think it's what goes best with palm trees but also because I recently bought some liquid latex (yeah I know finally!) and couldn't wait to try it out. It works like a charmed and helps reducing the clean up time. I went to an "Halloween" shop in my City instead of spending a fortune on an indie website which just re-bottle liquid latex and humph the prices.
As usual, the black is just plain acrylic paint. Which is easier to work with than polish.
I hope I made you travel with my nails, I keep looking at them and picture me on a white sand beach with a cocktail in my hand, the wind in my hair and the waves crashing endlessly. Sigh, 2 MORE WEEKS!
See you next time!
-Mags
Once again I'm coming here and sharing a palm trees nail art. Can you all tell I'm longing for my vacation to start? Two more weeks to wait, so in the meantime, I'm bringing paradise to my nails.
I did those in a hurry before meeting friends for drinks and diner so they aren't as prefect as they could be. Also the pics are not the best quality for the same reason :/
I've done a gradient again, mostly because I think it's what goes best with palm trees but also because I recently bought some liquid latex (yeah I know finally!) and couldn't wait to try it out. It works like a charmed and helps reducing the clean up time. I went to an "Halloween" shop in my City instead of spending a fortune on an indie website which just re-bottle liquid latex and humph the prices.
![]() |
| My dominant hand which needed a bit more cover up, as I have had some trouble with the gradient (yay for heat wave!). |
As usual, the black is just plain acrylic paint. Which is easier to work with than polish.
I hope I made you travel with my nails, I keep looking at them and picture me on a white sand beach with a cocktail in my hand, the wind in my hair and the waves crashing endlessly. Sigh, 2 MORE WEEKS!
See you next time!
-Mags
Saturday, July 18, 2015
Fabiana's ManiSteal from Elie Corzo
Hello everyone!
It is a slow Saturday afternoon and I am doing some blog/community house-keeping. Time to turn my eyes to the Nail Art Coven. :)
I am a little at at time working my way to more current manis. Today's post is the #manisteal I did of the sunny mani done by +Elie Corzo. She did a gorgeous orange based neon sponge base and used vinyls for a silver swirl. The effect was hypnotic to me! I didn't have vynils, but I think the stamping worked pretty well. :) I did a base of pale gray and the glow in the dark "Guiding Light" from Serum No. 5. Then sponged on the neons, finally stamped with Essie "No Place Like Chrome". I had an absolutely horrible time parting with it. It was soo beautiful!
Polishes
Serum No. 5 "Guiding Light"
Cirque "Hatch"
Color Club "Wham! Pow!"
Color Club "Warhol"
Color Club "Poptastic"
Color Club "Almost Famous"
Color Club "Twiggie"
Essie "No Place Like Chrome"
Stamping Plate
Pueen 59
Here is how the mani looks under a UV light because of Serum No. 5:
Here is a link to Elie's original mani. Link
That's all for now!
Affectionately, Fabiana.
Monday, July 6, 2015
Fabiana's Adventures Photographing Neon and Glow in the Dark Nail Art
Hi, everyone.
As I mentioned in the previous post, I have a lot more to say about neons and glow in the dark polish. More specifically, I have a lot to say on photographing them. I have seen some glorious glow in the dark nail art photography out there. And also some that are less than successful. I am not impressed with the blurry ones. I am not impressed with the ones that don't look like they are glowing at all. I spent a lot of time in trial and error, so I am going to share with you what I have learned so far.
First, I had to understand the distinction between neon polishes and glow in the dark polishes. They are not the same. Neon polishes are exceptionally bright and glow beautifully under an LED or UV light. Glow in the dark polish, if you hold it under the LED or UV light for 30 seconds, will reflect the light and glow on its own for a little while! Keep in mind I have very little experience with this, but my first few experiments were so exciting I HAVE to share.
So my first attempt at photographing neon is below: I just used an LED light (Sensational LED Lamp) and photographed in darkness. I wanted to see it glow and I was completely blown away by the fact that it DID! It was so bright it was ridiculous.
Woof, that was a long post, but I hope you enjoyed it! I am learning and as I go along, I will share more. :)
-Fabiana
As I mentioned in the previous post, I have a lot more to say about neons and glow in the dark polish. More specifically, I have a lot to say on photographing them. I have seen some glorious glow in the dark nail art photography out there. And also some that are less than successful. I am not impressed with the blurry ones. I am not impressed with the ones that don't look like they are glowing at all. I spent a lot of time in trial and error, so I am going to share with you what I have learned so far.
First, I had to understand the distinction between neon polishes and glow in the dark polishes. They are not the same. Neon polishes are exceptionally bright and glow beautifully under an LED or UV light. Glow in the dark polish, if you hold it under the LED or UV light for 30 seconds, will reflect the light and glow on its own for a little while! Keep in mind I have very little experience with this, but my first few experiments were so exciting I HAVE to share.
So my first attempt at photographing neon is below: I just used an LED light (Sensational LED Lamp) and photographed in darkness. I wanted to see it glow and I was completely blown away by the fact that it DID! It was so bright it was ridiculous.
The problem with this was that you have to photograph under the LED lamp. It will not glow away from the lamp. And I am really not a fan of the blue fingers... But oh well, something for me to think about.
That photo started it all! I was on a mission now to find bigger better neons and the pinnacle for me... glow in the dark.
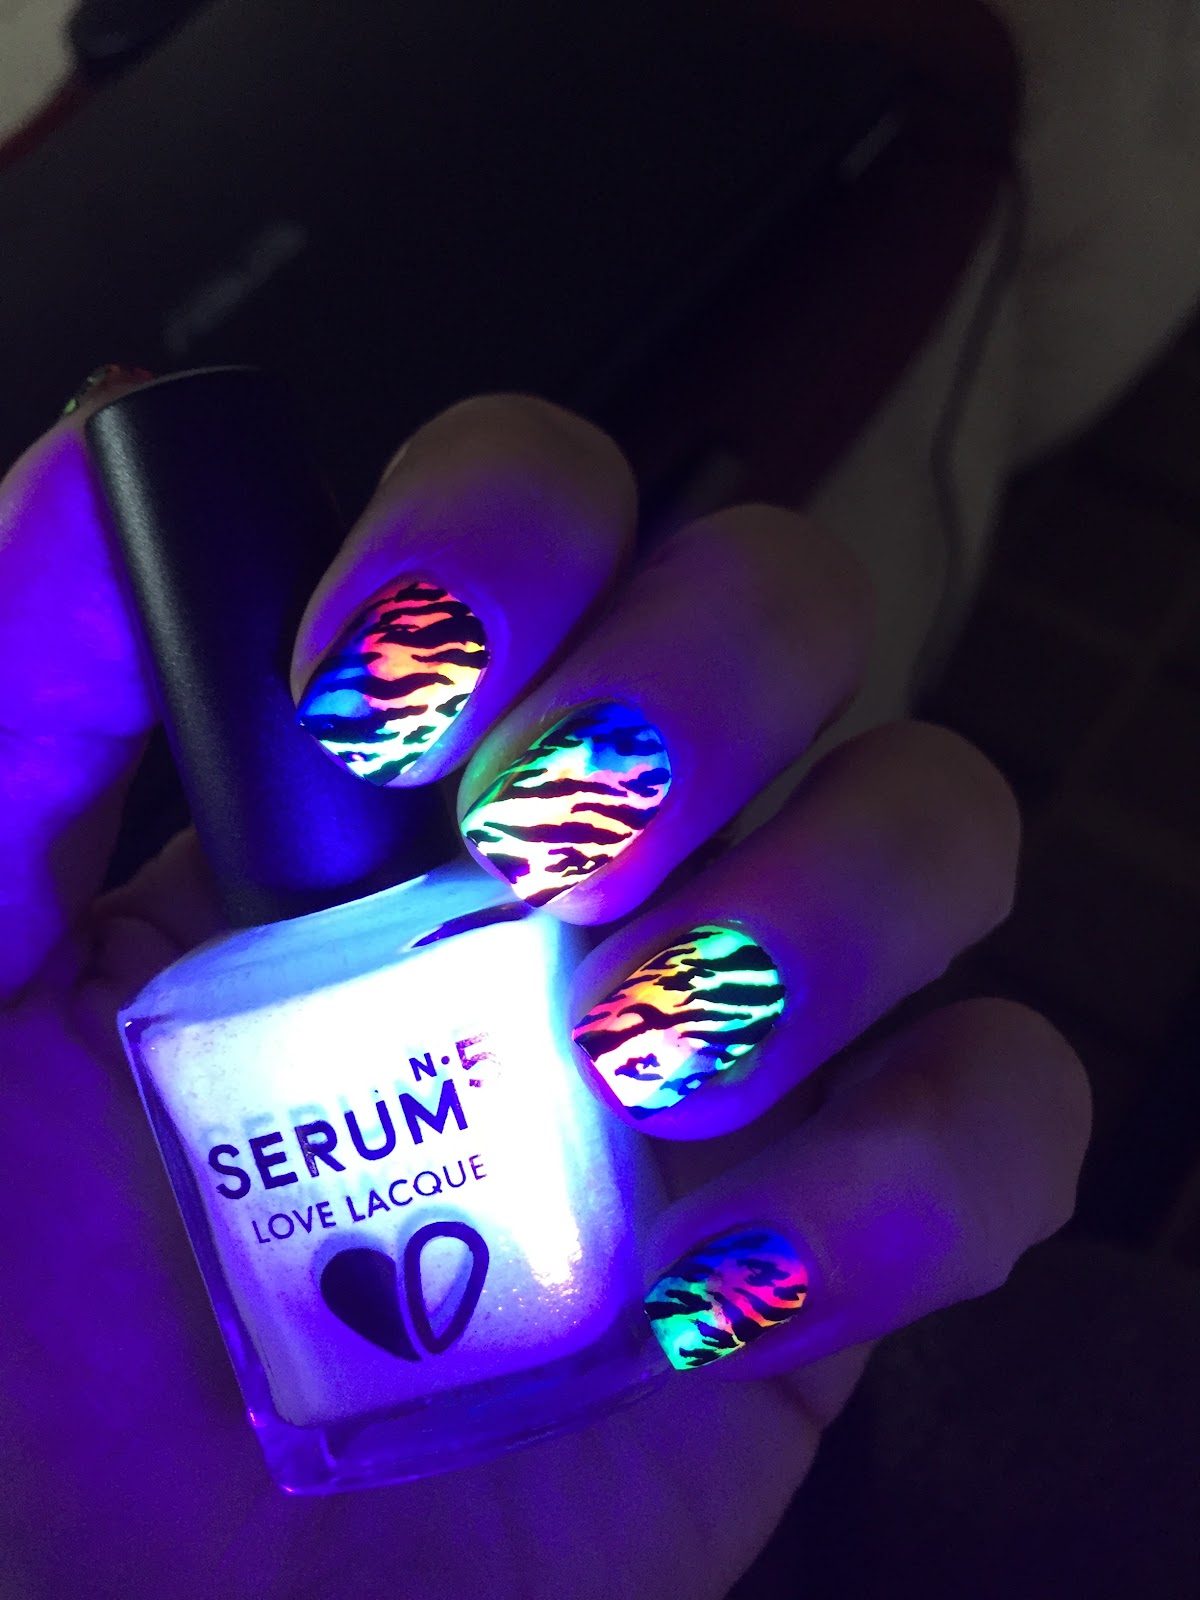
So two ridiculously big orders of Serum No. 5 later, some of them arrived!
(I had also order a small UV light)
This is how they looked after charging them with the UV light. Not terribly impressive.
And here is the first mani I did with them. It was charged under the UV lamp. Not terribly impressive.
Attempt three. Starting to fast forward a bit. Not great, but pretty. Still too dark. Disconnected floating blobs charged by the UV light.
Fast foward to my favorite neon/glow in the dark mani so far.
This is the original mani.
Now. Let's make it glow! And glow it does. :)
So now, I start to experiment with an LED Lamp that came with the Sensationail Gel Kit.
I set it up in my bathroom and turned off the lights. Not bad... A significant improvement. This mani was a combination of neon and glow in the dark.
Next, charged the glow in the dark with the LED Lamp. Oh that glow!!! MAGICAL.
But I still wasn't getting the hair raising, bow you away glow. So further experimentation was in order. The final combination and the one that made me a fan of neon and glow in the darks for life.
The UV Light casting a glow around nail art not in complete darkness but shade.
It is a bit bizarre what I had to do since I don't have a UV light stand. I had to hold the light at a contorted angle next to my iPhone as I took the picture. Painful, but oh so worth it. Much like strappy high-heels.
One misstep. Shining the UV light directly on the nails. It has it's own charm, but it doesn't really bring out all the wonderful colors.
The first of the great success holding Serum No. 5 "Orange You Sunny". Talk about sunny!
My favorite was holding Serum No. 5 "Guiding Light". The softer glow lit up the mani just right!
-Fabiana
Saturday, July 4, 2015
Fabiana's ManiSteal from Karen Sulkowski
Hello, Everyone!
I am so behind on posting. I am doing my nails constantly but not getting around to posting.
So when you last saw me, I had done a ManiSteal from Crystal Bond. Today, I have for you my ManiSteal from the lovely +Karen Sulkowski. Her wonderful cheetah, zebra print print rainbow mani inspired by +Robin Moses Nail Art - Nail Art Tutorials, Nail Designs, Easy DIY Nail Art Ideas, Nails was just spectacular so that is the mani I chose.
I am going to keep this post limited to the mani. However, keep an eye out for a future post where I will be talking in depth about glow in the darks, neons and my trials photographing them.
Polishes:
Sally Hansen "Vibrant Violet"
Color Club "Warhol"
Color Club "Glitter Envy"
Orly "Glowstick"
Serum No. 5 "Orange You Sunny"
Serum No. 5 "Indi-glo"
Serum No. 5 "Guiding Light"
Deborah Lippmann "Misty Morning"
This was so much fun to do! I started with a white base.
Then added the neons. Yes, it looked like a big mess!
Then I painted the black stripes and cheetah pattern in black acrylic paint. And then it all came together!
This is how the mani looks under UV light
This is the glow in the dark effect! There was no bad picture!
And here is +Karen Sulkowski original interpretation. You should definitely check her out in Google+ :)
Both Karen and I followed the tutorial by the super talented Robin Moses. Link to tutorial
For now, wishing you a happy July 4th, Fabiana.
Wednesday, July 1, 2015
Fabiana's ManiSteal from Crystal Bond
Today, I have for you the #ManiSteal that I did from +Crystal Bond The Polish Plebe beautiful freehand neon stripes.
I really have to give it to her. This was a CHALLENGE. You do the black base. Then you do the white strips. THEN you paint over the white stripes with the neons...
#FACEPALM!
Let's start with doing your nails starting around 11 at night. Strike one.
I am horrible at freehand stripes. Striiike two!
The consistency of the neon polishes I used varied and most were on the "I don't feel like going on evenly!" lot. Striiiiike three, YUR OUTTA HERE!
I know... whine, whine, whine.
It took me a few hours, but the end result was really striking. Har har! The game was won... at a high cost of patience and sleep deprivation. ;)


Polishes:
Color Club "Glitter Envy"
Color Club "Warhol"
Serum No. 5 "Orange You Sunny" (I will be doing a post soon where you will be able to see just how glorious this glow in the dark is)
Serum No. 5 "Indi-glo"
Zoya "Charisma"
Cirque "Memento Mori"
Here is Crystal's original mani:

I really encourage you to check out her blog! :D The Polish Plebe
Until next time, sincerely yours, Fabiana.
I really have to give it to her. This was a CHALLENGE. You do the black base. Then you do the white strips. THEN you paint over the white stripes with the neons...
#FACEPALM!
Let's start with doing your nails starting around 11 at night. Strike one.
I am horrible at freehand stripes. Striiike two!
The consistency of the neon polishes I used varied and most were on the "I don't feel like going on evenly!" lot. Striiiiike three, YUR OUTTA HERE!
I know... whine, whine, whine.
It took me a few hours, but the end result was really striking. Har har! The game was won... at a high cost of patience and sleep deprivation. ;)
Polishes:
Color Club "Glitter Envy"
Color Club "Warhol"
Serum No. 5 "Orange You Sunny" (I will be doing a post soon where you will be able to see just how glorious this glow in the dark is)
Serum No. 5 "Indi-glo"
Zoya "Charisma"
Cirque "Memento Mori"
Here is Crystal's original mani:
I really encourage you to check out her blog! :D The Polish Plebe
Until next time, sincerely yours, Fabiana.
Friday, January 9, 2015
NPQ Challenge - Neon - Showcase
The first challenge of 2015 was neon. Because there's no better way to start the new year with bright colors, it helps us get over the festivities of the New Year and brings us brightness and happiness.
The moderators of the Nail Polish Queens wish you all a happy new year 2015.
Here are the pretty manicures of our members for the neon challenge:


_________

This week's challenge is patchwork. The possibilities are endless and we're looking forward to seeing your creations.
Subscribe to:
Comments (Atom)


